
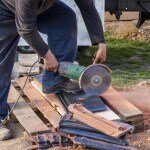
Rigid tile saws are the only way to get a good plus professional cut. In comparison, snap tile blades simply don’t cut it. Utilized securely, rigid tile saws will help you producing plenty of cleanly- cut floor tiles to your precise specifications.
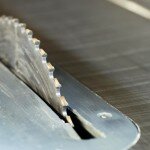
Ridgid, the best tile saw is made to easily slice tile and smooth rock with a higher amount of accuracy. Since saws depend on water to awesome the particular blade also to offer lubrication to the floor tile since it arrives into connection with the rotating blade, they fabricate a minimum level of dust.
Ridgid has integrated numerous advanced functions into its type of damp saws which allow an individual to execute complex cuts when utilized properly. With exercise, the common homeowner can slash tile and rock as proficiently as an expert mason.
Required Tools:
- Eye protection
- Dust mask
- Work hand protection
- Water supply
- Tile or stone
- Electric outlet
6 steps to Use a Ridgid Tile Saw ?
Step 01: Make sure the ongoing work area is nicely ventilated and uncluttered. The floors ought not to be slippery or wet. Usually do not operate the saw near flammable fluids, gases or some other combustible materials. Usually do not plan on doing design, assembly or style focus on the saw desk while the saw motor is on (once the blade is spinning).
Step 02: Set the trimming blade only feasible by loosening the particular depth adjustment button (large dark button on left part of motor housing) after that decreasing the particular blade. Tighten the particular depth adjustment button. Push the task material contrary to the rotation of the blade, never through the trunk of the best tile saw.
Ensure that the little bit of materials to be take off (little bit of floor tile that may discarded as soon as slice) offers enough room to slip sideways after cleaning the blade. Without having plenty of discard area, the materials may bind tightly contrary to the blade as it has been cut. Don’t overextend your arm’s achieve to keep up proper ground and stability. Usually push the material nicely at night saw blade when trimming.
Step 03: Insert the particular removable water connect in to the drainage opening inside the trunk from the water tray. Pour approximately 5 gallons of water in to the water tray. Secure the water tray lock (right part of saw framework) so the water tray are not able to turn out to be dislodged.
Ensure that the water level within the water tray is greater than the reduced water scale mark within the water tray (just use water in the tray, in no way chemicals or some other additives).
Step 04: Connect the saw’s built in floor fault signal interrupter (GFCI) right into a 120 volt grounded (3 prong) power store. Check to be certain the power indicator gentle occurs (LED will be in the GFCI housing). Push the GFCI test switch. The particular LED indicator gentle should turn off. Press the GFCI reset button again to get ready the saw for make use of. If the GFCI properly fails to function, do not utilize the saw.
Step 05: Place the materials to be cut (tile or even rock) upon the task table, pushed firmly contrary to the function desk fence (flexible arm that will manuals the materials through the saw since it is being slice). Adjust the task table fence to the required range from the blade; so that once the material will be pushed against it, it’ll guide the material over the saw blade at the required cutting spot. Utilize the scale guidelines (noticeable lines) on the task desk fence for research if required.
Step 06: Put on work gloves plus eye protection. Carefully improve the “On/Off” change to show the particular saw on. Wait around until the blade is to speed and is thoroughly wet before you begin any cuts up. Ease the sliding function desk towards the blade and gradually commence to feed the material in to the revolving blade.
Continue gradually pushing the slipping function table before blade cuts totally through the materials. Without having shifting the slipping work table, switch off the saw, and then draw the task table back in your direction after the blade has halted spinning completely. Take away the cut materials, alongside any leftovers that stick to the particular sliding work desk.
Repeat the trimming procedure for all your bits of materials that require to become cut. Pay out continuous focus on the water level in the water holder and include water as necessary. Clear the machine completely whenever finished to avoid blockage of the watering system throughout subsequent use.
Related Posts
-
 How to Sharpen a Tile Saw Blade ?
-
 How to Cut Tile without a Tile Saw ?
-
 Best Tile Saw Reviews & Buying Guide 2016
-
 How to Cut a Plaster Wall With a Reciprocating Saw ?
-
 How to Cut Metal with a Table Saw ?
-
 Get familiar with how to use a CNC Plasma Cutter
-
 How to Cut Stainless Steel with a Jigsaw ?
-
 How to Exactly Cut Table Leg Braces Through a Chop Saw ?

