
Do you know how to make a DIY plasma cutter at your home? If you are not aware of this fact, then this is high time to try something truly interesting.
Wannabe engineers will find it amazing once they’ve done the project successfully.
Contents
What is a mini plasma cutter?
For your convenience, a mini plasma cutter is nothing like a dedicated machine but this guide will make you learn about something you can make at your home easily.
You’ll need a set of apparatuses in order to make this DIY plasma cutter. However, plasma is referred to as the arc of fire that needs to be maintained while cutting metal sheets.
Although plasma cutters differ from type to type, from rating to requirements, their main working principle is the same in all that is to cut metal sheets precisely.
However, let’s move forward to learn how to make a DIY plasma cutter at your home.
Things you’ll require:
There are a few things that you’ll need to prepare according to this guide on how to make a homemade plasma cutter.
Don’t worry, as the things you’ll require will surely be available in your home.
Get these things at your vicinity first
- a charger (with DC output and rated up to 20+ volts, if possible)
- a pencil leads (not too long nor too short, best if it is HB and 0.7mm in diameter)
- copper wires of small diameters and short length, enough tape,
- metal sheet (best if you can collect any foil paper),
- an AC power source.
How to make a DIY plasma cutter with these?
Follow these steps on how to make a plasma cutter:
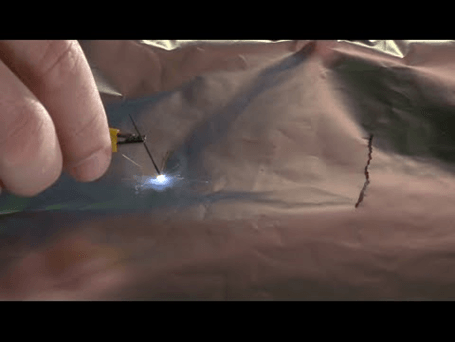
- Firstly, take the DC adapter and connect two wires at the two output terminals of the adapter output jack.
- Take one of the strongest HB pencil leads.
- Connect the pencil to the positive part of the adapter output wire and the foil paper with the negative terminal of the adapter output wire.
- Now hold the wire that holds the pencil lead. Scroll and scratch the lead down to the foil paper and you’ll see that the paper is being cut to the places where it is touching the paper.
Get familiar with how to use a CNC Plasma Cutter
What is the principle working behind this DIY plasma cutter?
Pencil lead is connected with the positive terminal and the foil paper is connected with the negative terminal out of the adapter terminals.
When these two portions get in contact, the electrical circuit is completed and thus the connection point gets heated.
The heat is high above the melting point of the foil paper but not the pencil.
That is why the pencil lead will remain almost the same but the foil paper will meltdown, which ultimately seems like you are cutting the foil paper down very easily.
That is the secret behind this DIY plasma cutter.
Safety measures before making a DIY plasma cutter and using it:
Before you proceed on with this guide on how to make a plasma cutter, make sure you remember these following terms:
- Make sure you connect the final power source last, after doing all the other steps on this guide on how to make a homemade plasma cutter.
- Make sure the connections are connected before taping the wires around the adapter output jack. Also, don’t forget to wound the tape strongly so that the connections are tight.
- While cutting down the foil paper, you should not touch the foil paper and the pencil lead directly. Although it is DC-powered, the magnitude of the power level can still shock you quite vibrantly.
You can see this video for detail : ( Source: Youtube)
Conclusion
When you have all the things at your home then why not make something this interesting?
Making a DIY plasma cutter at home will give you ideas about cutting thick metal sheets in industries. In addition, it will also enhance your knowledge in order to develop it further.
Read more: 10 Best Plasma Cutters Review 2021