Beginner guide on how to operate a MIG welder, MIG welding is a popular welding process for both professionals and amateur welders for many reasons: it is versatile, fairly easy to learn, and it produces strong and clean welds. The process involves fusing metals by heating them using an electric arc formed between a wire electrode and the workpiece.
Read More: How To Make A DIY Plasma Cutter At Your Home?
The electrode is fed through the MIG gun, and it then consumed into the weld pool. The process also uses a shielding gas to protect the weld puddle from contaminants.
MIG welder is a go-to-go tool for a couple of home repair and basic fabrication projects, from fixing new floor pans to welding panels in your car. With proper knowledge and correct setup, this machine is frequently used to weld thick-alloy steel as well as thin gauge sheet metal. In this article, we will highlight the basics of a MIG for a beginner who wants to learn how to operate one.
Contents
-
1 How To Operate A Mig Welder
- 1.1 Step 1:Get the right MIG welder
- 1.2 Step 2: Prepare the welding area
- 1.3 Step 3: Attach Ground Clamp
- 1.4 Step 4: Welding gas
- 1.5 Step 5: Determine Welding Settings
- 1.6 Step 6: Turn on Welder
- 1.7 Step 7: Adjust Wire Speed and Voltage
- 1.8 Step 8: Ensure Welding Torch Has Appropriate Amount of Wire
- 1.9 Step 9: Position your gun at the right angle
- 1.10 Step 10: Pull the trigger and start welding
- 1.11 Step 11: Turn Wire Feed to Lowest Setting
- 1.12 Step 12: Close Gas Cylinder Valve
- 1.13 Step 13: Turn Off Welder
- 1.14 Step 14: Remove Ground Clamp
- 1.15 Step 15: Coil Wires
How To Operate A Mig Welder
Think of this Instructable as a guide to get you started MIG welding. Welding is a skill that needs to be developed over time, with a piece of metal in front of you and with a welding gun/torch in your hands.
Step 1:Get the right MIG welder
For a start, don’t make the mistake of going overboard when picking your MIG welder. Most beginners don’t need a machine that welds more than a 1″ thick sheet of metal. They can do just fine with a machine that welds from 1/4″ -1/2″ thick metal. This means that a 185 amp MIG welder is plenty enough, and one may not even need to use the highest amperage setting. Also, make sure your welder can hook the gas tank to it for the shielding gas.
Read More: Lincoln 140 MIG Welder (Review & Comparison Chart)
Step 2: Prepare the welding area
The first step is to prepare the area to be welded in. Remove any flammable materials and clean the surface of any dirt, paint, oil coating, or other substances.
You can use a wire brush or a grinder to clean and prepare the metals. Do not use chemical solvents for cleaning surfaces unless you are sure they will not leave behind some traces or break down into toxic chemicals during welding.
If you will be welding where other people are present, mark the area by setting up welding curtains around your work area to protect passersby from UV damage. .
Step 3: Attach Ground Clamp
The ground clamp is required and can be attached to any metal surface that can provide an adequate ground. In this case, the welding setup table is used.
You can also use this time to hook up the ground connection on the piece you will be working on
And you can hook the ground cable to a bench but closer to the arc much as possible. You should also ensure that your workpiece is clamped to be able to withstand the current load. If you lose contact, your welder will keep on pumping out the wire resulting in false starts.
Step 4: Welding gas
- Open Cylinder Using Handwheel
-
Turn Adjusting Screw
You’ll need to use shielding gas for MIG welding to protect your weld pool from atmospheric contaminants such as Oxygen and Nitrogen that cause porosity. When applying the gas, you’ll want to ensure that the gas flow is sufficient to ensure that the weld bead is fully protected. However, you should be careful not to release too much gas as this can lower the temperature of the weld pool. You can use different type gas with you MIG welder including;
- Pure Argon -for non-ferrous materials such as aluminum.
- Carbon Dioxide -CO2 is a low-cost alternative but produces a lot of spatter.
- Argon mix- this is a mixture of Argon and CO2, and it is the most preferred as it produces high-quality welds with minimal spatter.
The other option is flux core wire welding. This is where you use a wire filled with flux rather than gas to protect the weld puddle. The advantage of this method is that you can weld in windy conditions, but gas gives you the advantage of seeing the weld puddle clearly.
Step 5: Determine Welding Settings
The gas composition can be viewed on the cylinder – 75% Ar / 25% CO2.
The thickness of the material (ga) you are welding is the last parameter you need to determine the Voltage and wire speed.
Step 6: Turn on Welder
Once you know the settings to apply and have a safe area, turn on the welder using the switch circled in the image. Note, for this particular unit the slowest wire speed is 50 meaning that pulling the trigger on the gun will always feed the wire. This is important to note in case you have to release pressure, for example, you went above 15 CFH in Step 5.
Step 7: Adjust Wire Speed and Voltage
The next step is to tune your welder correctly before you start laying the first welds. MIG welders are designed with settings that enable them to feed wires at the specified rates. For example, if the feeding speed is too fast or too slow, the wire will not melt consistently into the weld puddle, which means you’ll need to adjust your wire speed accordingly.
However, the wire speed will depend on the thickness of the workpieces, and there is a chart that comes with your machine showing the exact settings for your wire speed, voltage, among other parameters. The voltage settings determine the temperature as well as the height and width of the weld bead. You’ll need to set your machine on the lowest voltage to weld on thinner metal and increase or decrease the voltage depending on the thickness of the metal.
Read More: Do Welder Make Good Money – The Garage Guys Guide to Welding
Step 8: Ensure Welding Torch Has Appropriate Amount of Wire

Once the area is prep and everything is set, install the welding wire into your machine so that you can feed it through the gun and into the weld puddle. Ensure to use a wire that is compatible with the material you are welding. The thickness of the wire will increase as the thickness of your material increases. However, ensure to check the specific recommendations on the chart inside your MIG welder. The general wire sizes include;
- 0.23″ -this size can be used to weld thin metal sheets from 24-16 gauge, and it is suitable for small machines.
- 0.3″ wire– this is the standard size, often included with your machine and it is perfect for metals up to 1/8″
- 0.35″ wire – this is an ideal size for beginners, and it is best for materials up to 1/4″.
- 0.45″ wire – this wire size can be used for materials from 1/4″ and above, and it is best suited for industrial applications.
Trim the wire accordingly and ensure that it is straight as possible to avoid tangles on the feeder. Always ensure that the tension on the reel is tightened to prevent the wire from unraveling. Also, clean the wire of grease and rust to ensure clean beads and don’t leave the wire for extended periods in the welder to prevent rusting.
If the wire is too long, just clip it until it is a reasonable length.
Step 9: Position your gun at the right angle
When welding, you’ll need to angle the MIG gun at a specified travel angle to enable you to see the welding puddle properly. This will also ensure that the weld is getting enough shielding gas. For starters, 15 degrees is an excellent travel angle. However, for butt joints, the gun is generally held at 90 degrees, although the working angle can be modified to 45 degrees to suit thin materials.
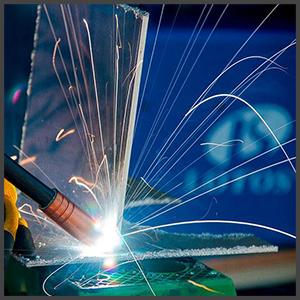
Step 10: Pull the trigger and start welding

Once you’ve tuned your welder and set the gun at the right angle, it is finally time to start welding. Once you pull the trigger, the following functions will happen simultaneously;
- An arc will form
- The wire will start to feed at the specified rate and,
- The shielding gas will begin to flow out of the nozzle.
At this point, you’ll want to go slow enough to allow for a good, hot weld but not too slow to burn through the metal. The idea is to weld as hot as possible but without burning through. You can start by testing on thinner materials as thicker ones won’t easily show how the heat is affecting the workpieces.
Pay close attention to the size of your weld beads. If they are too thin, it means you are moving too fast, and this will not have good weld penetration. If you are applying good heat, your metal should have a bluing effect after you have finished welding. Ensure that the wire length is consistent to ensure regular and clean welds. Once you are done with running the weld beads, you can then proceed to weld joints.
Step 11: Turn Wire Feed to Lowest Setting
Step 12: Close Gas Cylinder Valve
Close the handwheel until it is tight.
Step 13: Turn Off Welder
Turn the welding unit off using the ON/OFF switch.
Step 14: Remove Ground Clamp
Remove your ground clamp from the welding table.
Step 15: Coil Wires
Neatly coil all the wires.
As a beginner, the idea is to learn how to operate a MIG welder before you put some work into the skill. The more you practice, the better you become, and within no time, you become a pro. Always remember to use the safety gear and the operating manual as different models may have different features and functionality.
The best MIG welder for you: Lincoln 140 MIG Welder